
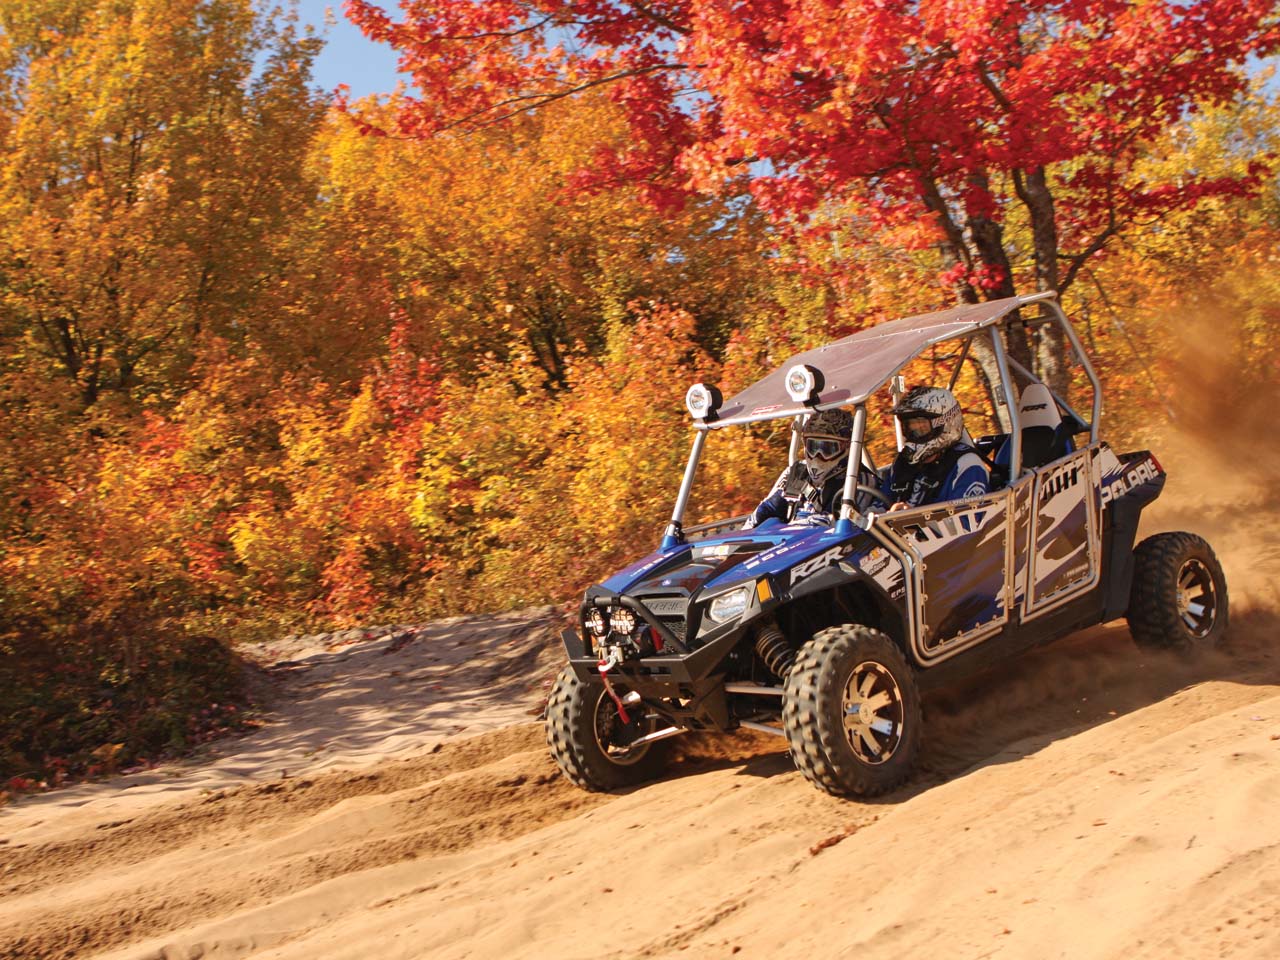
 Anyone who has purchased a 2011 Polaris RZR 4 already knows that they’ve found a great product with a very high “FUN FACTOR”. We’ve spent a lot of time blazing down many different kinds of trails and terrain with the RZR4, and it always keeps you excited and stands up to just about anything that you can put in front of it. Accessories can make an already great vehicle even better however, and we decided it was time to add on a few toys that would benefit our RZR. The trick was we wanted to add accessories that the average person could do at home in their shop with no special tools required; just bolt on and go. After comparing our test rider experiences we came up with a small wish list of accessories.
RZR 4 Wish List
After being caught in a rain storm one day 30 miles from camp with all four of us getting soaked, a roof was first on the list. We tried an aluminum roof from Polaris. As it turns out, there are plenty of roofs for a standard RZR, but not many for the longer RZR4. By choosing a roof from the people who built the vehicle, we were guaranteed it would fit. Next on our list was a winch. With the four-seater, we often find ourselves riding it with a full crew rather than taking two vehicles. That means there is no rescue or tow vehicle in case of a flat tire or that occasional mud hole that was deeper than imagined but could not be left alone. We all know that getting this thing stuck could require more than a few strong bodies so we looked to our friends from Warn to solve the problem. They did just that and sent us a very nice bumper and winch combo that looks sweet, will provide great front end protection, and serves as a sturdy platform for the winch.
Tires were next on the list. Although the factory installed Big Horns are some of the best all-around tires, they don’t protect the edge of the wheel very well and we have had a few cuts in the sidewall. We were looking for a little more durability and less chance of that flat tire leaving you on the side of the trail. Bill at MTC Tire Company recommended a set of 14 inch Kenda 8 ply tires that are built for heavy duty UTV use. Bill explained the Kenda tires were designed with a better sidewall and with a deeper lip to protect the rim. He also picked a set of great looking VISION cast aluminum wheels for their durability, wider stance, and protection, and if that’s what the expert recommends, that’s what we’ll go with.
Night rides are always fun, but the factory lighting wasn’t quite as bright as we liked. It always left us a little on edge while looking into the dark and hoping there wasn’t anything in our way. The last thing we needed to find on the trail at night was a downed tree, a dead vehicle, or Bambi’s dad. We’ve used the PIAA lighting on ATVs for night races, and for our RZR project, we went with a lighting package from PIAA that included two flood style lights that we mounted down low and two HID long range lights. Now we can ride with confidence longer into the night and it lights up the trail brighter and farther ahead than ever before.
The last item we wanted to add was both for safety and for looks, and we couldn’t resist putting on a set of PRO-ARMOR doors which really set off our RZR4 and make getting in and out of the vehicle a breeze. The aluminum tubing looks GREAT against the RZR blue and white color scheme and we get a ton of comments from people everywhere on them. Most importantly, they help keep you safely tucked inside. Pro-Armor also included a set of their easy release, 5 point harnesses that keep you strapped into your seat in case something crazy happens. Although we didn’t expect to need them, we gave them a proper test as well. Way to be thorough on the testing RickieBobby!
Installation Time - Tips and Helpful Hints
Warn Winch and Bumper Combo
We were very pleased with this product. The Warn bumper is precision built, there are no sharp edges or burrs, and it’s super tough. All holes are already in place, and it’s powder coated in a highly durable, black finish. It looks GREAT! To install the WARN bumper, first unbolt the stock one, have a buddy help you hold it in place, and begin bolting it back on! The instructions are clear and it easily bolts into the same mounting holes. Since the bumper comes complete, you won’t need to do any extra drilling and in no time you’ll be better protected.
Installing the Warn winch is easy enough also, but we are sticklers for making the job look as professional as possible, and that means routing the wires neatly from the winch, through the front firewall, and under the dash. Again, Warn supplies a very clear set of instructions and a helpful wiring diagram. The key to installing the winch is carefully laying out the wires so they are not in the way of moving parts or exposed to anything that could cause damage. On the RZR 4, we were able to hide the wires very well, using part of the frame tubes, and by mounting the winch solenoid next to the battery. We also routed the wires underneath the bodywork around the shifting lever column for a clean look. We really like the winch location and ease of getting to it on the bumper. It’s mounted at just the right height for most conditions, and we won’t have to fish it out of the mud when we need it (Installation time = 3hrs). TIP: Have a buddy help, and use plenty of zip ties when routing wires. Also, mount switches on dash where you can easily get to them, but they won’t be in the way
Kenda Tires & Vision Wheels
After putting in a few plugs in the stock tires, we definitely wanted a tire with a tougher side wall and better protection for the wheel. Bill at MTC (Motorcycle Tire Company) has more tire experience than just about anybody and he recommended a set of new Kenda 585, 8 ply 14 inch tires that were specifically designed for UTVs. Sure enough, the Kenda’s definitely have more sidewall protection, and the bead is tucked back inside the tire slightly to better protect the rim. The tread pattern is open enough to allow for a good bite on the terrain, but they also do a good job of cleaning out in mud. We’ve tried them on everything from sand to hardpack, and they’ve been holding up excellent. Handling and ride is very similar to the stock tire. With over 700 miles on them, we still haven’t had a problem, and they’re barely showing any wear. The leading edge of each lug is still in excellent condition.
Bill also suggested the cast aluminum Vision Wheels, and these wheels look GREAT! The polished areas of the wheel set against the black interiors really set off the vehicle looks, but more importantly, they are tough. Ours have been holding up very well. At first we were a little concerned about the heavier tire and wheel package, but any effect on vehicle power was negligible. As a set, we’re very happy with both the tires and wheels. Good call Bill!
PIAA Lights
The PIAA lights are of the highest quality and work outstanding. When we ordered the lights, we wanted a package that would fit our RZR and light up the darkness much better, but in keeping with the project’s simple, bolt-on mandate would also not require us to change the electrical system stator. PIAA had just the kit for us!
The PIAA lighting kit came with a complete wiring harness and directions. We opted to mount two lights down low by the bumper, and two HID lights up high. You may have to drill the mounting holes yourself depending on where you mount your lights, but prior to drilling, lay everything out and make sure you have enough wire and a safe route to run them. When you’ve determined your wire routing, go ahead and drill the mounting holes and get to work. We did have to extend our main power wires from the battery to the lights, thanks to the battery location on the RZR4, but that’s no big deal. Once we had a solid power source, we were able to plug everything in and hide the harness under the dash. Again, we were careful to do a neat routing job, tucking wires where they would not be seen or possibly damaged. You won’t believe how the woods light up when you turn on the new set from PIAA! They are extremely bright and make night riding a blast! (Installation time = 3hrs). TIPS: Have a buddy help, use plenty of zip ties, and again mount switches on dash where you can easily get to them, but they won’t be in the way. We also recommend sealing connections with silicone, including the back of switches. When driving don’t forget to turn them off for oncoming drivers. You don’t want to blind the oncoming driver.
Pro Armor Doors and Five Piont Seat Belts
Nothing set off the looks of our RZR project like the cool looking, Pro Armor doors and graphics kit. It just looks more finished! Installing the doors does mean removing a couple stock pieces, but you won’t need any specialized tools to get the job done.
When installing the doors, the best way to start is to lay out all of your pieces and then read your directions. This will help you better understand the pictures on the directions. The key to putting the doors on is to make sure that you find a level place to pick up the RZR evenly at all four corners and take the pressure off the roll bar. You need the chassis to be square, and since you will be temporarily taking a couple bolts out of the roll cage, everything needs to be square to fit better. We set ours on two shipping crates of identical height. When you remove the roll cage bolts, don’t be surprised at how much they spring apart. We found that using a basic ratchet strap and strapping the front two roll bar posts together makes it a snap to put the bolts back in. Install all bolts as directed, but don’t tighten anything down completely until you’ve checked alignment and fit. As long as you bolt everything in loosely first, then tighten, the doors will fit nicely. We really liked the fact that there is no drilling or modifications to install the doors. The graphics were of the best quality and very simple to install, leaving you with great looks and safety too (Total installation time = 4 hours).
We also installed five point harness seat belts from Pro Armor. Again, they use all factory mounting locations with no drilling required. At first we thought that perhaps we wouldn’t need them, but the Pro-Armor belts are very easy to get used to, and they are comfortable. More importantly, they hold you securely in place and keep you well protected inside the vehicle. Adjustment is easy with a couple straps, and taking them off when the ride is done is super easy as well. We love ‘em, especially after Bobby showed us how well they work! TIPS: Be patient! The Pro-Armor doors are very functional, providing far easier entry and exit, and they increase safety. As usual, have a buddy help (he’s going to want a ride anyway), follow the directions, and you’ll like the end result both with the doors and the safety harness.
Polaris Aluminum Roof
The Polaris roof comes with very clear instructions, but you probably won’t even need them. As expected, fit and finish on this product is very good. One helpful hint is to use all of the foam tape provided and be sure to place it on any part of the roll bar that the roof would be in contact with. This will allow for a better fit and keep anything from vibrating. The instructions only show tape being used on the main two roll bar sections, but we stuck it every place there was a possibility of metal to metal contact (Installation time = 20 min). TIPS: Use plenty of the foam tape. Place roof on top, check for alignment on all sides, and then tighten down.
Heaven with Four Tires, Four Doors, and Four People!
The few modifications we put on our Polaris RZR 4 made a great vehicle even better. It’s fun to drive or ride, it’s more capable than ever, and it gets a lot of looks whether on the trail or the trailer. We were concerned with the added weight but didn’t notice any major performance differences, and now we can go riding long distances with confidence that we’ll get there and back with ease, regardless of the trail or the weather. The Polaris RZR 4 is a very well designed vehicle that does a great job, and we’re pleased with it and the accessories we bolted on.
PRO ARMOR – Doors, Seat harness, & Graphics
888-312-7667
MTC - Tires & Wheels
800-288-4682
WARN - Bumper & Winch
800-543-9276
PIAA Corp. - Lighting
800-525-7422 or 503-489-6666
KENDA - Tires
POLARIS Ind. - Roof & RZR 4
 |
 |
 |
 and the Vision Wheels look great on our RZR4. More importantly, they work excellent and the wider wheel offset increases width and stability as well.") |
 |
 |
 |


